🎯 Objective
This module guides practitioners on how to document a session with a student using the Healthy Campus platform, including key workflows, options, and documentation requirements.
🚨 Before You Begin: Important Notes on Student Data
- Do not test with real student data!
- Never perform dry runs, sample visits, or testing using your real email/account with actual student profiles.
- Use the demo link and credentials provided during training for any testing or practice.
- If you need help accessing the demo environment, contact your district staff.
🏠 Step 1: Navigating to a Student Profile
- Log in to the Healthy Campus platform.
- On the homepage, you’ll see a list of students along with their clearance status (Red, Yellow, or Green).
- Only Yellow or Green students can be documented for services.
- You can search for a student by name, student ID, or birthday. You can also filter by school and grade. Once you locate your student, click on the student to view their profile and begin a visit.
🗓️ Step 2: Starting a Visit
When viewing a student’s profile, you have three visit options:
- Walk-In Visit (demonstrated in this module)
- Schedule an Appointment
- Create a Care Plan
Note: This module focuses on Walk-In Visits. Click Walk-In Visit from the student profile to begin!
Student Session Screen
- Once you begin a session, the timer starts automatically (to track the session duration for auditing purposes, not billing purposes).
- You can enter the notes after the session. If entering the session later, you can manually adjust:
- Start time
- End time
- Session Date
🧾 Step 3: IEP Status
- The system will ask: “Are the services part of the student’s IEP?”
- Yes = Documentable but no claim will be generated.
- No (default) = Services are billable and will generate a claim.
➕ Step 4: Adding Services to the Session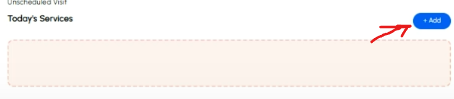
- Under Today's Services, click the blue “Add” button to choose services:
- You will search or browse your district’s catalog of services on the right hand side
- Examples: Initial assessment, GAD-7 screener, service bundles, etc.
- Select your service(s) and note the green check mark when
selected
- Click the blue “Add to Session” button at the top to add selected services.
- Services will appear under “Today’s Services”:
- Red service = Needs completion
- To complete a visit, click on each service to fulfill required fields (e.g., surveys or documentation).
- Simpler services may not require any input—mark as complete.
- Optional: You can repeat the above steps to add Next Steps
🧭 Step 5: Documenting the Session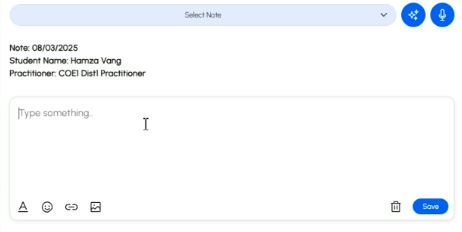
- Use the notes field on the right to document your session.
- You may:
- Type free-text notes.
- Use templates provided by your district via dropdown.
- Upload a photo of handwritten notes (click the photo icon).
- Always consult your clinical training and supervisor guidance on what to include in session documentation
🖊️ Step 6: Finalizing Notes and Ending the Session
- When finished taking your note, click the blue “Save” button to save..
- On the bottom left of the session screen, sign the note:
- Click the signature field (bottom-left).
- Your signature will be auto-saved.
- Click the red “End Session” button.
- Adjust session start/end time and date if needed.
- Click the green “Confirm” button to:
- Finalize the services.
- Automatically generate a claim (if eligible).
✅ You're Done!
You have now successfully documented and completed a student session in the Healthy Campus platform and helped support sustainable behavioral health services for your community. Congratulations!
🧠 Tips & Reminders
- Use demo credentials for practice—not your real account.
- Use district-provided templates or handwritten note upload if preferred.
- Document accurately per clinical standards and supervisor guidance.
- Always save, sign, and confirm the session.